공식문서는 다음과 같음 (clang을 사용한 경우나 큰 차이 없음)
https://code.visualstudio.com/docs/cpp/config-clang-mac
핵심 포인트는 .vscode 디렉토리에 만들어지는 다음의 3개의 파일을 이해하는 것임.
tasks.json: compiler build settinglaunch.json: debugger settingc_cpp_properties.json: compiler path 와 IntelliSense 설정.
0. Pre-Requisites
0-0. vscode 설치:
2023.12.15 - [개발환경] - [vscode] How to install vscode: macOS, Linux, Windows
[vscode] How to install vscode: macOS, Linux, Windows
How to install vscodemacOS, Linux, 그리고 Windows에서의 vscode 설치에 대한 방법을 다룸.MacOShomebrew를 이용하여 설치하는 것이 가장 편한 방법임.brew install --cask visual-studio-codeReferencehttps://formulae.brew.sh/cask/vi
ds31x.tistory.com
C/C++ extension:
Shift+cmd+x로 extension 창에서 C 또는 C++로 검색하여 설치.
0-1. 필수 Extension 설치
gcc (GNU Compiler Collection) 설치:
brew install gcc1. Create Test app
다음의 명령어로 static_linking 이라는 디렉토리를 만들고, 이로 이동하여 vscode를 수행.
mkdir static_linking
cd static_linking
code .
static_linking 디렉토리에 다음의 3개의 C 소스코드파일과, 2개의 .h 헤더파일을 만든다.
1-0. source 파일들.
main.c
// main.c

#include <stdio.h>
#include "lib1.h"
#include "lib2.h"

int main(int argc, char** argv){
    printf("argc: %d\n", argc);
    for(int i=0;i<argc;i++) {
        printf("%2d: %s\n", i, argv[i]);
    }
    print_hello();
    print_hi();
    return 0;
}
mylib1.c
//mylib1.c

#include <stdio.h>
#include "lib1.h"

void print_hello(){
    // int a = 0;
    // printf("Enter a single int:\n");
    // scanf("%d",&a);
    // printf("Entered int: %d\n",a);
    printf("Hello from lib1\n");
}
lib1.h
#ifndef LIB1_H
#define LIB1_H

void print_hello(void);

#endif
mylib2.c
//mylib2.c

#include <stdio.h>
#include "lib2.h"

void print_hi(){
    printf("Hi from lib2\n");
}
lib2.h
#ifndef LIB2_H
#define LIB2_H

void print_hi(void);

#endif
2. 복수의 c 파일로 하나의 executable file 빌드.
Explorer (shift+cmd+e)에서 entry point(main())가 있는 main.c를 선택하여 active file로 처리.
에디터의 우측 상단(top right)의 play 버튼을 클릭.
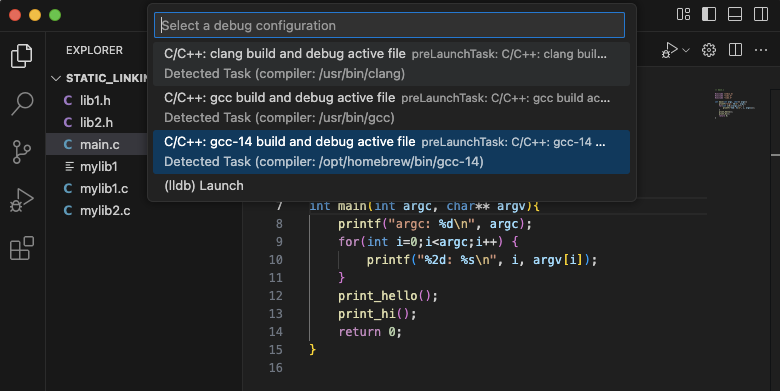
이 문서에서는 clang이 아닌 gcc를 사용하는 것이므로 C/C++: gcc-14 build and debug active file 을 선택.
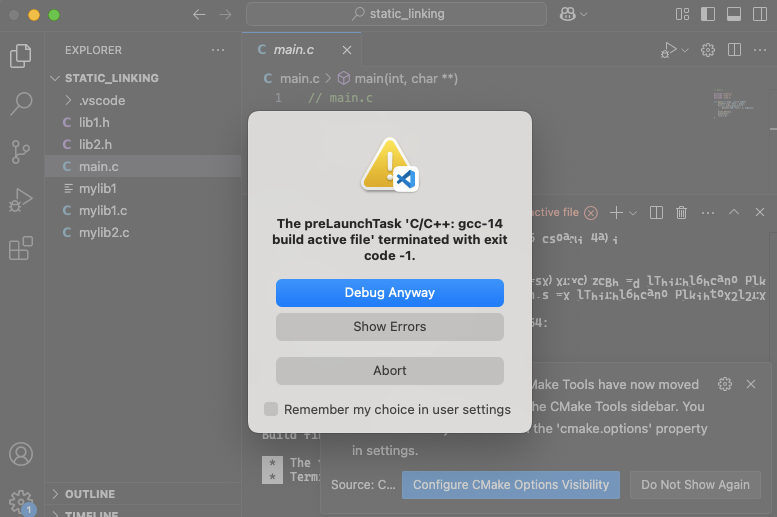
현재 프로젝트에서는
- 3개의 C 소스파일이 컴파일되고 링크되어 하나의 executable 파일이 만들어지는데,
- vscode가 기본으로 제공하는
tasks.json은 단일 소스파일 만으로 빌드를 시키는 구조라
위와 같이 빌드에서 에러가 발생함.
우선 Show Errors 를 눌러서 다이알로그창(위의 그림 참고)을 닫고,
왼쪽 하단의 CMake 관련된 notification을 닫고.
Explorer에서 .vscode에 새로 생긴 tasks.json 을 연다.

tasks.json 이 C/C++ 프로젝트에서 빌드를 설정하는 파일임.
여기서 "args"가 컴파일러인 gcc에 넘겨지는 arguments인데,
"${file}" 로 현재 active file만을 컴파일러에 빌드하도록 넘기고 있음.
여러 소스파일을 이용하여 하나의 executable 파일을 만드려면 다음의 수정이 필요함.
- 이
"args"의 "${file}"을"${fileDirname}/\*.c"로 수정하고, "label"을"C: gcc-14 build active file"로 수정하고,"detail"을"Task generated by Me."로 수정한다.
전체 내용은 다음과 같음:
{
    "tasks": [
        {
            "type": "cppbuild",
            "label": "C: gcc-14 build active file",
            "command": "/opt/homebrew/bin/gcc-14",
            "args": [
                "-fdiagnostics-color=always",
                "-g",
                //"${file}",
                "${fileDirname}/*.c",
                "-o",
                "${fileDirname}/${fileBasenameNoExtension}"
            ],
            "options": {
                "cwd": "${fileDirname}"
            },
            "problemMatcher": [
                "$gcc"
            ],
            "group": {
                "kind": "build",
                "isDefault": true
            },
            "detail": "Task generated by Me."
        }
    ],
    "version": "2.0.0"
}
다시 main.c 를 active file로 하고 (= vscode의 에디터창에 main.c 가 보여지는 상태) 나서, 다시 우측 상단의 play 버튼을 클릭

보안 으로 인해 보여지는 다이알로그 창에서 Allow를 클릭하고
하단에서 DEBUG CONSOLE 을 보면 빌드된 executable 파일의 실행결과가 보임.
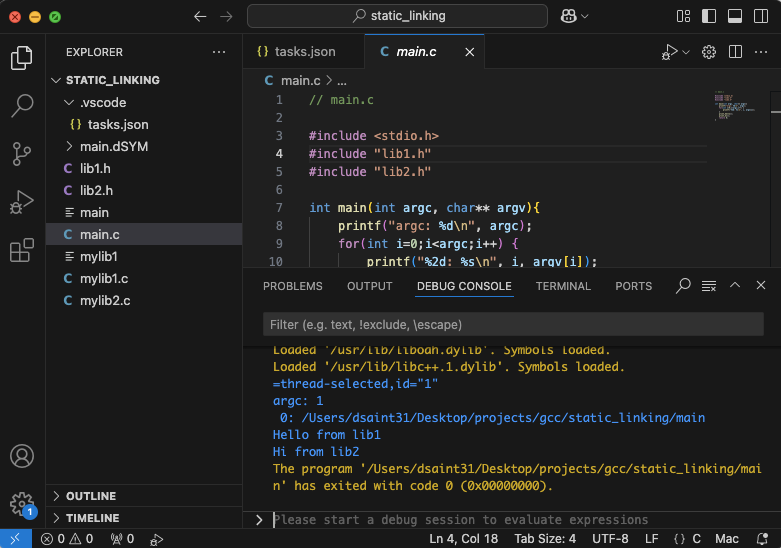
푸른색의 \=thread-selected,id="1" 의 밑의 줄이 printf로 출력된 내용임.
참고: tasks.json의 내용 분석은 아래에서 할 예정임.
3. Debug main.c
breakpoint를 12번째 라인에 설정 (해당 라인에서 f9 또는 라인번호 왼쪽의 margin을 클릭)

이후 우측상단의 play 버튼의 왼쪽에 있는 톱니바퀴를 누르고 C/C++: gcc-14 build and debug ... 를 선택
- 아까 tasks.json 에서
"label"을 수정한 것을 기억하고 해당 내용의 항목을 선택.

이를 통해 .vscode 디렉토리에 launch.json 파일 생성되고 에디터 창에 열림.
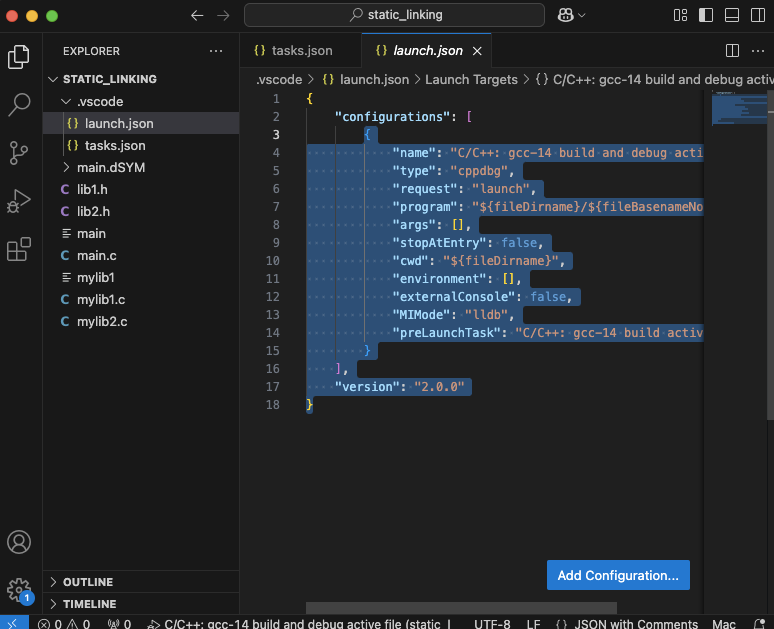
참고: 해당 파일은 debugger 설정을 담당하며, 이 파일에 대한 설명은 아래에 다시 할 예정이니 우선은 넘김.
이 과정을 통해 디버깅이 가능한 상태가 됨.
이제 entry point가 있는 C소스 파일인 main.c 를 active file로 하고 f5를 누르면 디버깅이 가능함
- 또는 좌측상단의 play 버튼 클릭해도 됨.
- 현재 12번째 라인에서
breakpoint가 설정되어 있으니 이 라인을 수행하기 직전에 멈춤
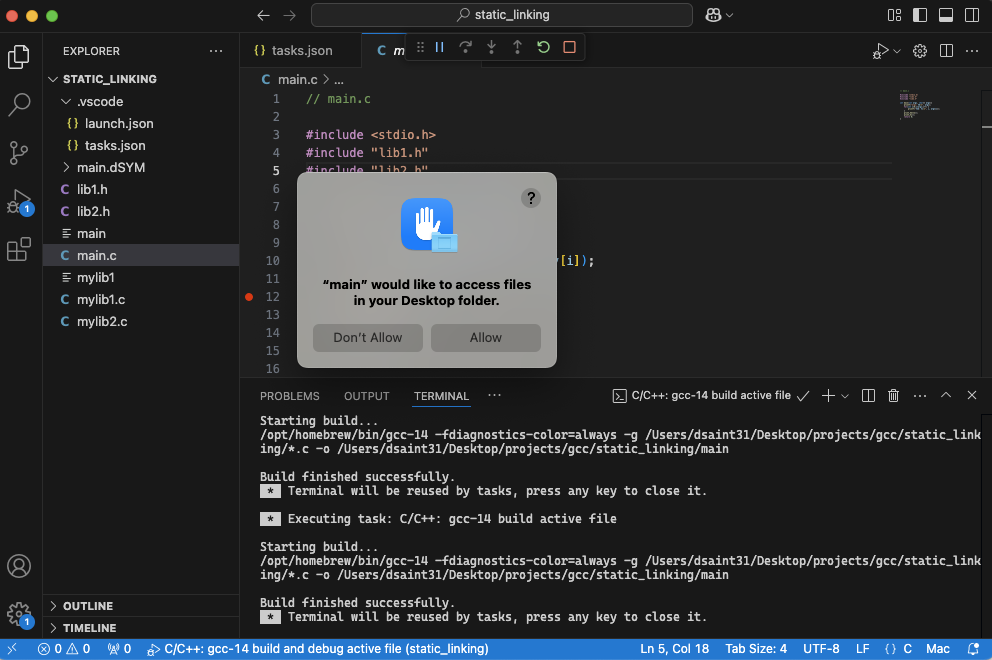
단, 보안상 문제로 뜨는 창(위 그림)에서 Allow를 클릭해야 함.

이후로는 중앙 상단에 있는 Debug Panel 에서 아이콘을 클릭하여

- 한 줄씩 수행(Step Over)하거나
- 해당 함수 내부로 이동(Step Into)하면서
- 왼쪽의
Variables상태등을 확인하는 디버깅이 가능해짐.
디버깅을 위한 단축키는 다음과 같음.
f10: Step Over- 현재 라인의 실행을 한 단계씩 진행
- 함수호출이 있으면 해당 호출을 처리하고 다음 라인으로 이동
f11: Step Into- 현재 라인의 실행을 한 단계씩 진행
- 함수호출이 있는 경우, 해당 함수의 내부로 들어감
f5: Continue- 디버깅을 계속 진행.
shift+f11: Step Out- 현재 함수에서 빠져나와 호출한 위치로 되돌아감
shift+cmd+f5: restart- 디버거를 재시작
shift+f5: Stop- 디버깅을 중지
하단에서 Debug Console을 선택하고 f10을 누르면 프로그램 수행에 따른 출력을 확인할 수 있음.

이제 entry point가 있는 C 소스 파일을 active file로 하고나서
play버튼 혹은f5를 통해 빌드 및 디버깅이 가능하며,- 이 과정의 세부 설정은
launch.json을 통해 가능함.
다음은 gcc (legacy)를 위한 맥용 launch.json 이며,
- 확인할 것은
"preLaunchTask"가 - 아까
tasks.json에 작성한 task의"label"과 같음을 확인할 것.
{
    "configurations": [
        {
            "name": "C: gcc-14 build and debug active file",
            "type": "cppdbg",
            "request": "launch",
            "program": "${fileDirname}/${fileBasenameNoExtension}",
            "args": [],
            "stopAtEntry": false,
            "cwd": "${fileDirname}",
            "environment": [],
            "externalConsole": false,
            "MIMode": "lldb",
            "preLaunchTask": "C: gcc-14 build active file"
        }
    ],
    "version": "2.0.0"
}- Apple Silicon에 대한 gdb가
brew로 설치가 안 되어서, lldb를 사용함 : 공식 저장소가 아닌gmerlino/homebrew-gdb를 사용하면 가능하긴 함- GDB는 Apple Silicon에서 공식적으로 지원되지 않음.
4. Adding additional C/C++ settings: c_cpp_properties.json
C/C++ extension을 좀 더 자세히 제어하는 용도로
c_cpp_properties.json 을 제공함.
Command Palette (shift+cmd+p)에서 C/C++ Edit Configurations (UI) 를 선택하여 해당 파일을 생성 또는 설정할 수 있음.
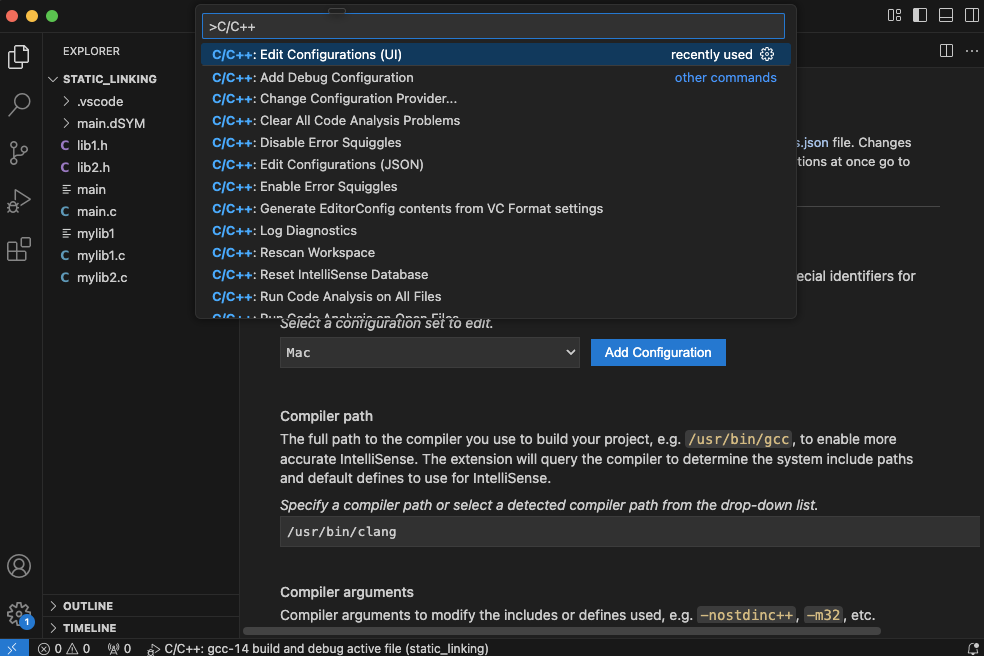
gcc에 맞추어 설정을 하고 나면 .vscode 에 c_cpp_properties.json 파일이 생성됨.

5. tasks.json 설정.
vscode에서 제공하는 task runner의 설정파일이기도 한 tasks.json 을 C/C++ 에서 build 에서도 사용됨.
- 지정된 task가 C/C++ 에서 메뉴상에서 이용되려면,
"type"의 값이 반드시"cppbuild"여야 함. "tasks"키의 값은 list로 여러 개의 task에 대한dictionary(curly bracket ({})으로 둘러쌓임)를 가질 수 있음.
각 task에서의 주요 키는 다음과 같음.
"type": task의 형태를 지정함."cppbuild"는 C/C++ 빌드 task임을 의미함.- `"cppbuild" 는 clang 이나 g++, gcc(legacy) 등을 command로 사용한다.
"python"으로 지정될 경우, python 이나 python3를 command 로 사용함.
"label": task를 식별하기 위한 일종의 id임.- 메뉴상에서 해당 값으로 구분할 수 있음.
"command": task에서 실행할 명령어를 지정함. 사용할 컴파일러를 지정할 수 있음.gcc,g++: GNU Compiler Collectionclang,clang++: Clang 컴파일러python,python3: Python 인터프리터.make: Makefile을 이용한 빌드npm,yarn: JavaScript 프로젝트용.javac,java: Java 컴파일 및 실행.
"args":"command"에 지정한 명령어에 넘겨질 인자들을 설정하는 list임. 다음은 gcc에서의 arguments임.-fcolor-diagnostics: 컴파일러 진단 메시지에 color 사용여부.-fansi-escape-codes: ANSI 이스케이프 코드를 사용.-g: 디버깅 정보를 포함하도록 설정.${file}: 현재 열려 있는 파일(active file)의 경로를 의미.-o: 출력 파일 이름을 지정.${fileDirname}/${fileBasenameNoExtension}: 현재 active file의 디렉토리와 확장자를 제외한 파일 이름을 의미.
"optinos": 명령 실행 옵션을 정의하는 부분."cwd"를 통해 working directory를 설정하는데 자주 이용됨."env"를 이용하여 환경변수를 설정하기도 함:{"env": {"PATH": "/usr/loca/bin:$PATH"}}
"problemMatcher": 빌드과정에서의 error를 탐지하고 매칭하는 패턴을 지정하는 부분."$gcc"를 통해 GCC 스타일의 에러메시지를 탐지."$msCompile": Microsoft Visual Studio 컴파일러 메시지"$eslint-stylish": JavaScript프로젝트에서 ESLint 스타일 메시지.
"group": 현 task의 그룹을 정의."kind": task의 종류를 지정함."build"로 빌드 task임을 설정."test": 테스트용 task"clean": 빌드 산출물 정리작업 task.
"isDefault": 기본작업(단축키로 실행되는 task)임을 의미.
"detail": 현 task에 대한 설명하는 text를 값으로 가짐.
2023.08.18 - [개발환경] - [Env] Vscode: task runner 설정: tasks.json
[Env] Vscode: task runner 설정: tasks.json
Visualstudio Code (vscode)는 프로젝트의 build등을 자동화하기 위해 custom task를 작성 및 수행할 수 있도록Task Runner라는 기능을 지원함.Task Runner는 tasks.json을 통해 build, test 등의 task를 단축키로 수행하게
ds31x.tistory.com
참고 URL
https://code.visualstudio.com/docs/editor/tasks
Tasks in Visual Studio Code
Expand your development workflow with task integration in Visual Studio Code.
code.visualstudio.com
https://bryanwweber.com/writing/2022-01-24-create-tasks-json-vs-code.html
Bryan Weber - Creating A tasks.json File for VS Code
VS Code has a super useful feature called tasks. These allow you to define and chain arbitrary shell commands or programs together and run them from the VS Code UI. This idea has effectively...
bryanwweber.com
https://stackoverflow.com/questions/34268034/where-is-the-tasks-json-file-in-vscode
Where is the tasks.json file in vscode?
I just start to use vscode in linux. I know that the build configuration are set in tasks.json. But where does this file locate? I tried Ctrl-Shift-P then tasks, no commands matching. build, no
stackoverflow.com
https://learn.microsoft.com/en-us/visualstudio/ide/customize-build-and-debug-tasks-in-visual-studio?view=vs-2022
Create build and debug tasks with JSON files - Visual Studio (Windows)
Create build and debug tasks with JSON files to instruct Visual Studio how to process code that it doesn't recognize.
learn.microsoft.com
https://code.visualstudio.com/docs/editor/tasks-appendix
Visual Studio Code Tasks Appendix
Additional info for using task runners in Visual Studio Code.
code.visualstudio.com
6. launch.json 파일 소개 및 작성법
launch.json 파일은 Visual Studio Code에서 디버깅을 설정하는 데 사용되는 파일.
- 이 파일은 프로젝트의
.vscode폴더에 위치하며, - 다양한 언어와 도구를 위한 디버깅 세션을 정의.
다음은 macOS에서 c 프로그래밍 프로젝트에 대한 launch.json 임.
{
    "configurations": [
        {
            "name": "C/C++: gcc-14 build and debug active file",
            "type": "cppdbg",
            "request": "launch",
            "program": "${fileDirname}/${fileBasenameNoExtension}",
            "args": [],
            "stopAtEntry": false,
            "cwd": "${fileDirname}",
            "environment": [],
            "externalConsole": false,
            "MIMode": "lldb",
            "preLaunchTask": "C: gcc-14 build active file"
        }
    ],
    "version": "2.0.0"
}"name": 디버깅 구성의 이름.- 일종의 식별자로 동작함.
"type": 디버거 종류를 지정.- 여기서는
"cppdbg"를 사용. - 가능한 다른 값들은 다음과 같음:
"node": Node.js 디버깅에 사용."python": Python 디버깅에 사용.
- 여기서는
"request":"launch": vscode가 프로그램을 시작시키고 디버깅."attach": 이미 실행중인 프로세스에 디버거를 연결하여 디버깅.
"program": 디버깅할 실행 파일의 경로.- 빌드로 만들어진 executable 파일의 경로를 지정.
"args": 프로그램 실행 시 전달할 인수들.- 문자열들을 기재하고, comma를 구분자로 할 수 있음.
- 예:
["arg1", "arg2","--verbose"]
"stopAtEntry": 프로그램이 시작될 때 디버거가 중지할지 여부.true일 경우, breakpoint가 없어도 실행되는 첫번째 코드라인에서 자동으로 중지함.
"cwd": 프로그램 실행 시의 현재 작업 디렉토리 지정.working directory를 지정함.- vscode의 변수를 지원.
"environment": 환경 변수를 설정."externalConsole": 외부 콘솔에서 프로그램을 실행할지 여부.- false로 설정하면 VS Code의 내장 터미널을 사용하고 출력은 Debug Console에서 이루어짐.
scanf등의 사용자 입력이false일 때는 제대로 이루어지지 못함.- 실행 중 사용자 입력이 필요할 경우,
true여야 함.
"MIMode": Machine Interface Mode- 사용할 디버거 를 선택함.
- 여기서는
lldb를 사용: Apple Silicon에서 권장됨. - 사용가능한 값:
"lldb": LLDB 디버거 사용."gdb": GNU 디버거 사용.
"miDebuggerPath":"MIMode"`에서 지정한 디버거의 path.- macOS의 경우, lldb가 권장되며 이 경우 지정할 필요 없음.
"setupCommands": 디버거 시작 시 실행할 명령어들- 디버거에서 실행되는 명령어들에 해당함.
- 위의 예제에선 사용하지 않음: 주로 gdb에서 이용됨.
"preLaunchTask": 디버깅을 시작하기 전에 실행할 작업(task)의 이름- 여기서는
"C: gcc-14 build active file"로, - 이는 gcc-14로 현재 활성화된 파일을 빌드하는 task을 의미.
tasks.json에서"label"에 같은 문자열을 가지는 task가 정의되어 있어야함.
- 여기서는
2024.10.09 - [utils] - [vscode] Debug 사용법 요약: Python + launch.json
[vscode] Debug 사용법 요약: Python + launch.json
0. Debug 수행 중인 VSCode 화면 (Debug view)VS code 에서 debug를 시작 하려면activity bar에서 “벌레와 플레이 모양의 icon” 를 클릭하고나오는 패널의 상단에 위치한 Run and Debug 버튼을 누르면,Debug Sidebar (=
ds31x.tistory.com
7. c_cpp_properties.json 파일 소개 및 작성법
macOS에서 Homebrew로 설치한 GCC
기준으로 작성됨.
c_cpp_properties.json 파일은
- Visual Studio Code(VS Code)의
C/C++확장 프로그램이 - IntelliSense,
- 자동 완성,
- 코드 탐색 등의
기능을 제공할 때 사용하는 설정 파일.
이 파일은 .vscode 폴더에 위치하며, JSON 형식으로 작성.
7-0. c_cpp_properties.json 파일의 역할
- IntelliSense 설정:
- 코드 자동 완성과 제안을 위해
- 사용하는 컴파일러 정보를 설정.
- 포함 경로 (includePath) 지정:
- 컴파일러가 헤더 파일을 찾을 수 있는 경로를 지정.
- 매크로 정의:
- 프로젝트에서 사용되는 Macro(매크로)를 정의.
- 컴파일러 표준:
- 사용할 C/C++ 표준을 지정.
7-1. Homebrew로 설치한 GCC를 사용한 c_cpp_properties.json 작성법
c_cpp_properties.json 파일 작성:
- vscode에서
C/C++Extension(확장 프로그램)을 설치한 후, - vscode에서 C/C++ 파일을 열고
-
C/C++: Edit Configurations (UI)(command pallets) 또는 - 직접
.vscode폴더에c_cpp_properties.json파일을 생성.
-
- 아래는 Homebrew로 설치된 GCC를 사용할 때의 설정 예시:
{
    "configurations": [
        {
            "name": "Mac",
            "includePath": [
                "${workspaceFolder}/**"
            ],
            "defines": [],
            "macFrameworkPath": [
                "/Library/Developer/CommandLineTools/SDKs/MacOSX.sdk/System/Library/Frameworks"
            ],
            "compilerPath": "/opt/homebrew/bin/gcc-14",
            "cStandard": "c17",
            "cppStandard": "c++17",
            "intelliSenseMode": "gcc-arm64"
        }
    ],
    "version": 4
}"name": 설정의 이름을 지정.- 이는 사용자가 선택할 수 있는 이름.
"Linux","Windows","Mac"등이 주로 사용되는 값임.
"includePath":- 컴파일러가 검색해야 할 헤더 파일 경로.
- Homebrew로 설치된 라이브러리의 헤더 파일이 포함된 경로를 추가할 수 있음.
- vscode의 변수들을 사용가능함:
"${workspaceFoler}","${fileDirname}"등.
"defines":- 프로젝트에서 사용하는 매크로를 정의.
- 매크로 정의 문자열등이 가능함.
- 예:
"DEBUG","VERSION=1.0"등등.
"macFrameworkPath":- macOS 프레임워크 경로
- 예:
"/Library/Developer/CommandLineTools/SDKs/MacOSX.sdk/System/Library/Frameworks"
"compilerPath":- 사용하는 컴파일러(clang or GCC)의 경로를 지정.
"cStandard","cppStandard":- 사용할 C와 C++ 표준을 지정.
"cStandard":"c89","c99","c11","c17","c2x"등"cppStandard":"c++98","c++03","c++11","c++14","c++17", "c++20", "c++23"등
"intelliSenseMode":- IntelliSense가 사용할 모드를 지정.
- GCC를 사용할 경우,
"gcc-x64"를 사용하는 것이 일반적. - M1, M2의 경우,
"gcc-arm"을 사용. - 가능한 값:
"msvc-x64"(Microsoft Visual C++ 64-bit)"gcc-x64"(GNU GCC 64-bit)"clang-x64"(Clang 64-bit)"gcc-arm"(GNU GCC for ARM)"gcc-arm64"(GNU GCC for ARM64)"clang-arm"(Clang for ARM)""\clang-arm64"(Clang for ARM64)
"version"- 문자열이 아닌 숫자값이 할당됨.
- 2025.1 현재 4 가 보통임.
7-2. 주의사항
- 경로 확인:
- Homebrew의 설치 위치에 따라 GCC의 경로가 다를 수 있음
- 정확한 경로를 사용해야 함.
- M1/M2 Mac:
- Apple Silicon을 사용하는 경우,
/usr/local대신/opt/homebrew경로를 사용해야 할 수 있음.
- 프로젝트 구성:
- 프로젝트가 사용하는 외부 라이브러리나 프레임워크의 헤더 파일 경로를
includePath에 추가해야 함.
같이보면 좋은 자료들
2024.10.09 - [utils] - [vscode] Debug 사용법 요약: Python + launch.json
[vscode] Debug 사용법 요약: Python + launch.json
0. Debug 수행 중인 VSCode 화면 (Debug view)VS code 에서 debug를 시작 하려면activity bar에서 “벌레와 플레이 모양의 icon” 를 클릭하고나오는 패널의 상단에 위치한 Run and Debug 버튼을 누르면,Debug Sidebar (=
ds31x.tistory.com
https://code.visualstudio.com/docs/cpp/config-clang-mac
Configure VS Code for Clang/LLVM on macOS
Configure the C++ extension in Visual Studio Code to target Clang/LLVM
code.visualstudio.com
https://code.visualstudio.com/docs/cpp/config-wsl
Get Started with C++ and Windows Subsystem for Linux in Visual Studio Code
Configuring the C++ extension in Visual Studio Code to target g++ and GDB on WSL installation with Ubuntu
code.visualstudio.com
2025.01.17 - [utils] - [summary] vscode
[summary] vscode
소개 및 설치 : vscode 소개 (visual studio 와 비교)2025.08.12 - [개발환경] - Visual Studio vs. VS Code Visual Studio vs. VS CodeIntegrated Development Environment vs. Code EditorIDE(Integrated Development Environment)는 코드 작성, 빌드,
ds31x.tistory.com
'utils' 카테고리의 다른 글
| [vim] 마우스 설정: (1) | 2025.01.20 |
|---|---|
| [vim] vim-plug 이용: nvim-treesitter, gruvbox (1) | 2025.01.20 |
| [summary] vscode (1) | 2025.01.17 |
| [vscode] Debug 사용법 요약: Python + launch.json : (3) | 2024.10.09 |
| [Utils] homebrew - Summary (0) | 2024.09.08 |


