CIFAR-10
Canadian Institute for Advanced Research (캐나다 고등 연구원, CIFAR)에서 CIFAR라는 이름이 붙여짐
(당시 연구자금을 지원한 단체의 이름에서 유래.)
CIFAR-10은
- Machine Learning 과 Computer Vision 의 학습에서 널리 사용되는 image dataset.
- 캐나다 토론토 대학교의 Alex Krizhevsky, Vinod Nair, Geoffrey Hinton에 의해 만들어짐 (2009년).
Alex Krizhevsky (알렉스 크리세브스키)는 ImageNet에서 딥러닝의 가치를 전세계에 알린 AlexNet(2012년)의 주요 개발자임.
AlexNet은 Alex Krizhevsky의 이름을 따서 명명됨.
https://dsaint31.me/mkdocs_site/ML/ch14_cnn/alexnet/
BME
AlexNet ori. ImageNet Classification with Deep Convolutional Neural Networks Alex Krizhevsky 의 이름을 따서 AlexNet. Hinton et al.이 Deep Learning의 위력을 확실히 알리는데 일조한 유명한 network임. ImageNet Large-Scale Visual Recogn
dsaint31.me
CIFAR-10은 이전에 MIT 와 NYU의 연구그룹들이 웹에서 수집한 약 8천만개의 컬러이미지로 구성된 "Tiny Images" 데이터셋을 기반으로 Labeling을 이루어진 Subset으로 CIFAR-10과 CIFAR-100이 있음:
CIFAR-10은 10개의 클래스로 구성되며, 각 클래스는 6,000개 이미지를 가짐.
CIFAR-100은 100개의 클래스로 구성되며, 600개의 이미지를 가짐.
구성 및 classes
1.Data 구성:
- 이미지 크기: 32x32 Pixels
- channels: 컬러 이미지 (RGB, 3채널)
- class: 10개의 상호 배타적. Multi-classes Classification 을 위한 Dataset
- class별 sample instance 수: 각 class마다 6,000장의 image sample (전체 60,000장)
2.Class:
CIFAR-10은 다음 10개의 classes로 구성됨:
- 비행기 (airplane)
- 자동차 (automobile)
- 새 (bird)
- 고양이 (cat)
- 사슴 (deer)
- 개 (dog)
- 개구리 (frog)
- 말 (horse)
- 배 (ship)
- 트럭 (truck)
3.데이터 분할:
- 훈련 데이터: 50,000장
- 테스트 데이터: 10,000장
용도 및 특징.
용도:
CIFAR-10은 image based multi-class classification task를 위한 모델을 학습하고 평가하는 데 주로 사용.
오늘날에는 CIFAR-10은 매우 단순하여 최신 모델의 성능을 비교하고 검증하는 벤치마크로서는 거의 사용되지 않음.
하지만, CIFAR-10은 상대적으로 작은 크기 덕분에 빠르게 실험을 반복할 수 있어 DL을 공부하는 데에 유용하게 사용됨.
특징:
- 다양한 classes:
- 서로 다른 10개의 클래스는 모델이 다양한 객체를 인식하고 분류할 수 있는 모델 구축에 유용함.
- 상호배타적으로 Multi-class classification 을 위한 모델 구축에 사용가능.
- 작은 이미지 크기:
- 32x32 픽셀 크기의 작은 이미지로 구성되어
- 학습에 요구되는 시간이 짧아 학습에 유리함.
- 데이터 다양성:
- 동일한 class 내에서도 다양한 각도, 조명 조건, 배경 등을 포함하고 있음.
- 다른 간단한 dataset에 비해 보다 모델의 일반화 능력을 평가하는데 유리.
PyTorch로 사용하기.
CIFAR-10 데이터셋을 사용하는 예시 코드 (PyTorch):
- 위 코드는 CIFAR-10 데이터셋을 로드하고,
- 이를 train, validataion, test 를 위한 dataset으로 나누고,
- 각각의 dataloader를 생성하고
- 일부 이미지를 시각화하는 간단한 예시임.
CIFAR-100 데이터셋도 PyTorch에서 지원함: torchvision.datasets.CIFAR100
필요한 module들을 import.
import os
import numpy as np
import matplotlib.pyplot as plt

import torchvision
from torchvision import datasets, transforms
from torchvision.transforms import v2
import torch
from torch.utils.data import random_split, DataLoader
Trainset과 Testset 생성.
torchvision 패키지의 datasets모듈의 CIFAR10 클래스를 이용함
class torchvision.datasets.CIFAR10(
    root: Union[str, Path],
    train: bool = True,
    download: bool = False
    transform: Optional[Callable] = None,
    target_transform: Optional[Callable] = None,
)
CIFAR10은 VisionDataset을 상속받고 있으며 VisionDataset은 torch.utils.data.Dataset 을 상속받음.
즉, CIFAR10은 Dataset이기도 함.
torchvision.datasets.vision.VisionDataset 을 상속하고 있음.
이를 이용하여 다음을 수행.
- cifar10을 다운로드
- train과 test를 위한 Dataset 생성.
torch.tensor로 변환.- standaradization을 수행.
# 데이터셋이 저장될 경로를 지정합니다.
data_path = os.path.join('dataset')

# 데이터 전처리 과정을 정의합니다.
# v1 버전.
# transform = transforms.Compose(
#     [
#         # 이미지를 PyTorch 텐서로 변환하며 [0,1] 범위로 normalization.
#         transforms.ToTensor(),  # N x C x H x W 로 변경됨.
#         # 이미지의 채널별 평균과 표준편차를 사용하여 정규화합니다.
#         transforms.Normalize(
#             (0.4915, 0.4823, 0.4468),  # CIFAR-10 데이터셋의 채널별 평균값
#             (0.2470, 0.2435, 0.2616)   # CIFAR-10 데이터셋의 채널별 표준편차
#         )
#     ]
# )

# v2버전.
test_transform = v2.Compose([
    v2.ToImage(),
    v2.ToDtype(torch.float32, scale=True),
    # standardization
    v2.Normalize(
        mean=(0.4915, 0.4823, 0.4468),
        std=(0.2470, 0.2435, 0.2616)
    )
])

# CIFAR-10 학습용 데이터셋을 불러옵니다.
cifar10_train = datasets.CIFAR10(
    data_path,             # 데이터셋 경로
    train=True,            # 학습 데이터셋 로드
    download=True,         # 데이터셋이 없을 경우 다운로드
    transform=transform    # 전처리 과정 적용
)

# CIFAR-10 테스트용 데이터셋을 불러옵니다.
cifar10_test = datasets.CIFAR10(
    data_path,             # 데이터셋 경로
    train=False,           # 테스트 데이터셋 로드
    download=True,         # 데이터셋이 없을 경우 다운로드
    transform=transform    # 전처리 과정 적용
)- CIFAR-10 학습용 데이터셋을 다운로드하고
data_path에 데이터셋을 저장. train=True로 설정하여 학습 데이터를train=False로 설정하여 테스트 데이터 를 다운로드.download=True로 설정하면 데이터셋이 로컬에 없을 때 자동으로 다운로드됨.transform은 불러온 데이터에 적용할 전처리 과정을 지정함:torchvision.transforms.Compose객체는 Callable임.
transform에서 tensor로 바꾸지 않으면 PIL.Image.Image 객체가 각각의 sample 임: [0,255]
- PIL에서 image는 Width x Height x Channels 로 구성됨.
- PyTorch에선 Channles x Height x Width 임.
2024.06.03 - [Python] - [Python] PIL, Pillow, OpenCV, and Scikit-image
[Python] PIL, Pillow, OpenCV, and Scikit-image
PIL, Pillow, OpenCV, and Scikit-imagePython에서 이미지를 다룰 때 이용되는 주요 패키지들은 다음과 같음.1.PIL (Python Imaging Library)PIL은 1995년에 처음 개발된 Python의 최초 이미지 처리 라이브러리 중 하나임.
ds31x.tistory.com
CIFAR10의 생성자 호출시 아래의 에러가 발생할 수 있음:
During handling of the above exception, another exception occurred:

URLError                                  Traceback (most recent call last)
/usr/lib/python3.11/urllib/request.py in do_open(self, http_class, req, **http_conn_args)
   1349                           encode_chunked=req.has_header('Transfer-encoding'))
   1350             except OSError as err: # timeout error
-> 1351                 raise URLError(err)
   1352             r = h.getresponse()
   1353         except:

URLError: <urlopen error [Errno 111] Connection refused>
이는 cifar10의 파일이 있는 아래의 URL이 죽은 경우임.
https://www.cs.toronto.edu/~kriz/cifar-10-python.tar.gz
이 경우, 위의 코드는 동작하지 않음.
이를 해결하려면,
우선 아래의 URL에서 cifar-10-python.tar.gz 을 다운로드하고 이를 수동으로 data_path 밑에 위치시키고,
https://drive.google.com/file/d/12tR0bgQwR4zNeA7c5EOJ27Vh51MflxpX/view?usp=drive_link
cifar-10-python.tar.gz
drive.google.com
다운로드후, 다음의 python code로 압축을 해제한다.
# 수동으로 cifar-10-python.tar.gz 을 업로드해서 사용하는 경우만 수행할 것.
import os
import tarfile

archive_path = os.path.join(my_root_path, "cifar-10-python.tar.gz")

if os.path.exists(archive_path):
    print(f"압축 파일 '{archive_path}' 발견. 압축 해제 중...")
    try:
        with tarfile.open(archive_path, "r:gz") as tar:
            # 압축 해제 대상 디렉토리 설정
            # CIFAR10 클래스는 cifar-10-batches-py 폴더를 찾습니다.
            extract_path = my_root_path

            # tar 파일 내부 구조를 확인하고, 필요한 경우 하위 폴더로 압축 해제
            # 대부분의 경우 tar 파일 안에 cifar-10-batches-py/ 와 같은 구조로 되어 있으므로
            # my_root_path에 바로 압축 해제하면 됩니다.

            tar.extractall(path=extract_path)
        print("압축 해제 완료.")

        # 압축 해제 후 파일 목록 확인 (선택 사항)
        print(f"\n압축 해제된 파일 목록 ({extract_path}):")
        !ls {extract_path}

        # 이제 download=False로 데이터셋을 로드하는 셀을 다시 실행해 보세요.

    except tarfile.TarError as e:
        print(f"압축 해제 오류: {e}")
    except Exception as e:
        print(f"예기치 않은 오류 발생: {e}")
else:
    print(f"오류: 압축 파일 '{archive_path}'을(를) 찾을 수 없습니다.")
    print("파일 이름이나 경로를 확인해 주세요.")
이는 다음의 shell script 에 해당함: curly bracket은 python code의 문자열 변수임 (colab등의 셀에선 그대로 수행가능)
!tar -xzf {archive_path}/cifar-10-python.tar.gz -C {data_path}
이후, CIFAR10의 생성자에서 download=False를 주고 수행하면 동작한다.
참고: 위에서 사용한 torchvision.transforms.Compose 는 PIL.Image.Image 객체 등을 사용하기 때문에, Scriptable 이 아님.
Python 가상머신 없이 고속 수행가능한 TorchScript로 변경가능한 경우 Scriptable이라고 부름.
raw 데이터를 모두 tensor로 변경한 이후는 scriptable한 transform이 가능하지만,
실제 jpg, png등의 raw데이터를 로딩은 PIL 의 사용이 보다 편리한 부분이 많음.
tensor로 모두 변경된 상태로 sciptable인 transform을 사용하는 경우라면
torchvision.transforms.Compose 대신,
torch.nn.Sequential을 기반으로 custom scriptable module 을 이용하거나,
완전한 custom scriptable transform 클래스를 사용할 것.
scriptable 하려면, torchvision.transforms 의 여러 전통적인 클래스를 활용하면 안된다
(torch.nn.Module을 상속받고 tensor만 처리하는 변환 클래스들만 가능)
scriptable transform을 위해선 torchvision.transforms 대신, kornia 라이브러리를 이용하는 것을 추천함.
https://docs.pytorch.org/vision/0.9/transforms.html#compositions-of-transforms
torchvision.transforms — Torchvision master documentation
torchvision.transforms Transforms are common image transformations. They can be chained together using Compose. Additionally, there is the torchvision.transforms.functional module. Functional transforms give fine-grained control over the transformations. T
docs.pytorch.org
여기서 얻은 cifar10_train과 cifar10_test는 torch.utils.data.DataLoader로 넘겨질 수 있음.
Validation set 분리
DataLoader로 넘겨지기 전에 train 데이터셋의 20%를 validation set으로 구분하는 코드는 다음과 같음.
from torch.utils.data import random_split

# 학습 데이터셋의 80%에 해당하는 크기를 계산.
train_size = int(0.8 * len(cifar10_train))

# 검증 데이터셋의 크기를 계산.
validation_size = len(cifar10_train) - train_size

# 학습 데이터셋을 학습용 데이터셋과 검증용 데이터셋으로 나눔.
train_set, validation_set = random_split(
    cifar10_train,               # 원본 학습 데이터셋 (torch.utils.data.Dataset 객체)
    [train_size, validation_size] # 나눌 크기 리스트 (학습용, 검증용)
)

# train_set과 validation_set은 모두 torch.utils.data.Dataset 객체임.
참고: Stratified Sampling
CIFAR-10은 balanced class dataset이며, 충분한 숫자의 instance들로 구성되었기 때문에,
Strarified Sampling을 하지 않아도 되므로 torch.utils.data의 random_split 함수를 사용함.
Stratified Sampling이 필요하다면, sklearn.model_selection 모듈의 train_test_split 함수와 torch.utils.data 모듈의 Subset 클래스(torch.utils.data.Dataset의 서브클래스)를 사용할 것.
sklearn.model_selection모듈의train_test_split은 데이터를 훈련용과 테스트용으로 분할하며,stratify옵션으로 클래스 비율을 유지한 분할도 가능한 함수임.Subset은 원본 데이터셋에서 지정된 인덱스들만 선택하여 부분집합을 만드는Dataset의 서브클래스임.
이 경우에 대한 예제 코드는 다음과 같음:
from sklearn.model_selection import train_test_split
from torch.utils.data import Subset

# =======================
# 인덱스와 레이블 추출

# cifar10_train 데이터셋의 모든 인덱스 리스트 생성
indices = list(range(len(cifar10_train)))

# 각 인덱스에 해당하는 데이터의 레이블(클래스) 리스트 생성
labels = [cifar10_train[i][1] for i in indices]

# ========================
# Stratified split

# train_test_split 함수를 사용하여 인덱스를 훈련 세트와 검증 세트로 분할
train_indices, val_indices = train_test_split(
    indices,
    test_size=0.2,   # 전체 데이터의 20%를 검증 세트로 할당
    stratify=labels, # 레이블 분포에 따라 계층적으로 분할하여 각 클래스의 비율을 유지
    random_state=42, # 랜덤 시드 설정하여 분할 결과 고정 (재현 가능성 확보)
)

# =======================
# Subset으로 분할

# cifar10_train 데이터셋에서 train_indices에 해당하는 부분으로 훈련 세트 생성
train_set = Subset(cifar10_train, train_indices)

# cifar10_train 데이터셋에서 val_indices에 해당하는 부분으로 검증 세트 생성
validation_set = Subset(cifar10_train, val_indices)
Stratified Sampling 에 대한 보다 자세한 설명은 다음을 참고:
https://dsaint31.me/mkdocs_site/ML/ch01/ch01_51/?h=stratified#stratified-sampling
BME
train_test_split 사용하기. ML에서 Test set은 training이 끝난 모델의 generalization error가 어느정도인지를 가늠하기 위해 반드시 필요함. overfitting이 쉽게 되는 high capacity를 가진 model일수록 test-set에 의한
dsaint31.me
DataLoader 생성
다음은 Dataset객체를 통한 DataLoader객체 생성하는 코드임.
# 학습 데이터셋에 대한 데이터 로더를 생성하는 코드임
train_loader = torch.utils.data.DataLoader(
    train_set,           # 학습용 데이터셋임
    batch_size=32,       # 배치 크기를 32로 설정함
    shuffle=True,        # 데이터를 무작위로 섞어서 로드함
    num_workers=0,       # 데이터를 로드할 때 사용할 sub-process의 수임
)

# 검증 데이터셋에 대한 데이터 로더를 생성하는 코드임
val_loader = torch.utils.data.DataLoader(
    validation_set,      # 검증용 데이터셋임
    batch_size=32,       # 배치 크기를 32로 설정함
    shuffle=False,       # 데이터를 섞지 않고 로드함
    num_workers=0,       # 데이터를 로드할 때 사용할 sub-process의 수임
)

# 테스트 데이터셋에 대한 데이터 로더를 생성하는 코드임
test_loader = torch.utils.data.DataLoader(
    cifar10_test,        # 테스트용 데이터셋임
    batch_size=32,       # 배치 크기를 32로 설정함
    shuffle=False,       # 데이터를 섞지 않고 로드함. 일관적인 평가를 위함.
    num_workers=0,       # 데이터를 로드할 때 사용할 sub-process의 수임
)num_workers=0: 데이터 로드가 메인 프로세스에서 수행됨.num_workers>0: 데이터 로드가 지정된 수의 서브 프로세스를 통해 병렬로 수행.
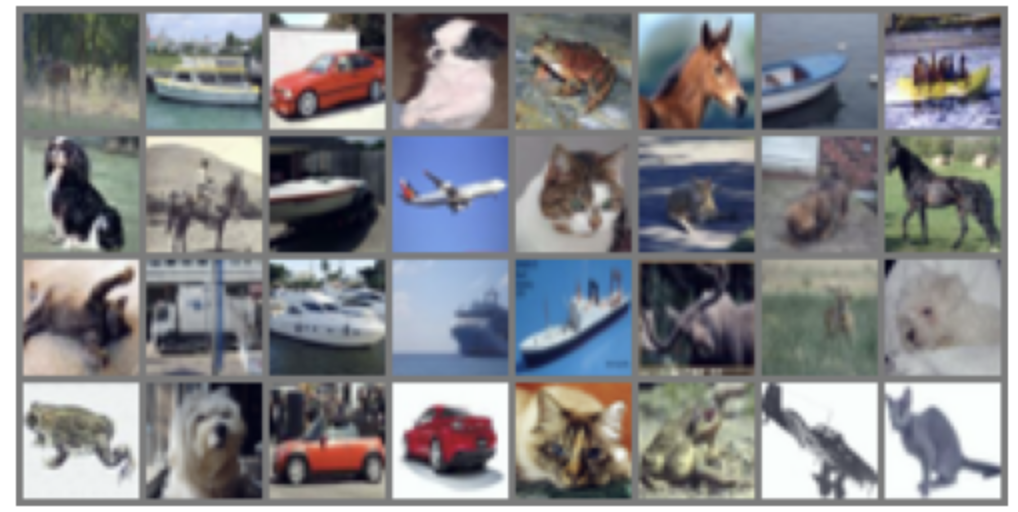
Image 보여주기
위의 dataset은 standardization이 되어 image를 보여줄 때 제대로 보여지지 않음.
때문에 이를 다시 min-max normalization을 하여 [0.0, 1.0] 으로 만들어
matplotlib.pyplot으로 정상적(?)으로 보여지도록 처리를 해야줘야 함.
# 데이터 로더에서 데이터셋의 첫 번째 배치를 가져옴
dataiter = iter(train_loader)
images, labels = next(dataiter)

# 이미지를 그리드 형태로 만들기 위해 여러 이미지를 하나로 결합함
grid_img = torchvision.utils.make_grid(images)

# 그리드 이미지에서 최대값과 최소값, 표준편차와 평균을 계산함
max_val = torch.max(grid_img)
min_val = torch.min(grid_img)
std_val = torch.std(grid_img)
mean_val= torch.mean(grid_img)

# 그리드 이미지의 타입, 최대값, 최소값, 평균, 표준편차를 출력함
print(f'{type(grid_img)=}\n{max_val.item()=}\n{min_val.item()=}')
print(f'{type(grid_img)=}\n{mean_val.item()=}\n{std_val.item()=}')

# 그리드 이미지를 정규화함 (값을 0과 1 사이로 조정함)
normalized_grid_img = (grid_img - min_val) / (max_val - min_val)

# 이미지를 matplotlib를 사용하여 시각화함
# 이미지는 (C, H, W) 형식이므로 (H, W, C) 형식으로 변경함
plt.imshow(np.transpose(normalized_grid_img, (1, 2, 0)))
plt.axis('off')
plt.show()
결과 이미지는 다음과 같음.
ImageFolder에서 사용가능한 디렉토리 구조로 저장하기.
torchvision.datasets.ImageFolder 의 테스트를 위해 해당 구조로 저장하려면 다음의 function을 사용하라.
- 주의할 점은 colab에서 google drive로 저장해서 직접 ImageFolder에서 읽어들이게 하면 너무 느려짐.
- 반드시 연산이 이루어지는 장비의 storage로 복사할 것.
from tqdm import tqdm
from torchvision.utils import save_image
from torchvision.transforms import v2, ToTensor
from torchvision.datasets import CIFAR10

def save_cifar10_as_imagefolder(root="./cifar10_imagefolder"):
    os.makedirs(root, exist_ok=True)

    # v2 transform 정의
    to_tensor_v2 = v2.Compose([
        v2.ToImage(),  # PIL → tensor 변환
        v2.ToDtype(torch.float32, scale=True)  # [0,255] → [0,1] + float32
    ])

    for split in ["train", "test"]:
        is_train = split == "train"
        dataset = CIFAR10(root="./data", train=is_train, download=True)
        split_root = os.path.join(root, split)

        # 클래스별 디렉토리 생성
        for label_name in dataset.classes:
            os.makedirs(os.path.join(split_root, label_name), exist_ok=True)

        print(f"[{split}] 저장 중...")
        for idx in tqdm(range(len(dataset))):
            img, label = dataset[idx]
            label_name = dataset.classes[label]
            filename = f"{idx:06d}.png"

            path = os.path.join(split_root, label_name, filename)
            # save_image(ToTensor()(img), path, padding=0)
            save_image(to_tensor_v2(img), path, padding=0)

    print("\nCIFAR-10 데이터가 ImageFolder 형식으로 저장됨.")

save_cifar10_as_imagefolder()
2025.06.17 - [Python] - torchvision.datasets.ImageFolder 사용하기.
torchvision.datasets.ImageFolder 사용하기.
torchvision.datasets.ImageFolder는 PyTorch에서 Image Classification Task를 위한 Dataset을 쉽게 구성할 수 있게 해주는 클래스임. 정확한 Full qualified name은 torchvision.datasets.folder.ImageFolder 임: torchvision.datasets 에 reex
ds31x.tistory.com
[torchvision] torchvision.utils.save_image and torchvision.io.encode_jpeg, torchvision.io.encode_png
주로 다음의 3가지를 개인적으로 사용함.save_image: 파일 직접 저장, 배치 그리드 배열, 정규화/시각화 기능 내장encode_jpeg: 손실 압축, 더 작은 파일 크기, RGB/Grayscale만 지원encode_png: 무손실 압축, 더
ds31x.tistory.com
같이 읽어보면 좋은 자료들
https://gist.github.com/dsaint31x/6d262365c5bfdd50e545dba367f0b8c2
dl_cifar10_pytorch.ipynb
dl_cifar10_pytorch.ipynb. GitHub Gist: instantly share code, notes, and snippets.
gist.github.com
'Python' 카테고리의 다른 글
| [Python] Ex: Relative Path Import 시 주의할 점 (1) | 2024.06.04 |
|---|---|
| [Python] PIL, Pillow, OpenCV, and Scikit-image (0) | 2024.06.03 |
| [ML] Dataset: Wisconsin Breast Cancer Dataset (0) | 2024.05.18 |
| [DL] Dataset: Boston Housing Price (1) | 2024.04.18 |
| [Python] collections.abc (0) | 2024.04.15 |


